Colonial window trim exterior is the one architectural detail that separates a house that looks assembled from one that looks considered. I’ve walked dozens of job sites where the bones were solid — good siding, fresh paint, decent landscaping — but the whole facade felt unresolved until someone added a proper casing and sill set around every window. The trim isn’t decoration. It’s the structural punctuation that tells your eye where to stop and what to read. Three houses prove this point better than any spec sheet: a clean-lined modern build, a Colonial Revival with all its period authority, and a cottage that had no business looking as polished as it does.
What makes colonial window trim work across all three is its geometry. Broad flat casing, a slightly projecting sill, and a header with just enough crown to create hierarchy — that’s the whole formula. You don’t need elaborate carving. You need correct proportions, the right material for your climate, and a color relationship between trim and wall that isn’t an afterthought.
Quick Scan
- Modern homes: Dark trim on a light facade — 4–6 inch PVC casing, Azek or Versatex board stock, color contrast is the whole move
- Colonial Revival: White trim on dark siding creates the symmetry and weight that defines the style — crown molding header is non-negotiable
- Cottage scale: Keep casing width proportional — 3.5 inch on small windows, wider reads as clunky on a narrow facade
- Material cost range: PVC cellular trim runs $4–$12 per linear foot installed; pine runs $1–$3 per linear foot but requires repainting every 5–7 years
- Interior colonial trim: Same profile logic applies — wider header, flat side casings, plinth blocks at the base if budget allows
Dark Colonial Trim on a Modern Facade Does Something White Never Could
The standard advice is white trim. I’ve used it. It works fine and photographs clean. But on a modern house with flat planes and minimal surface texture, white colonial trim on a white or light wall disappears — you’ve done the work and received none of the credit. The houses in this section make the opposite choice: dark trim, often charcoal or near-black, against a lighter facade. The result is a window that reads as a deliberate architectural element rather than a hole cut in a wall.

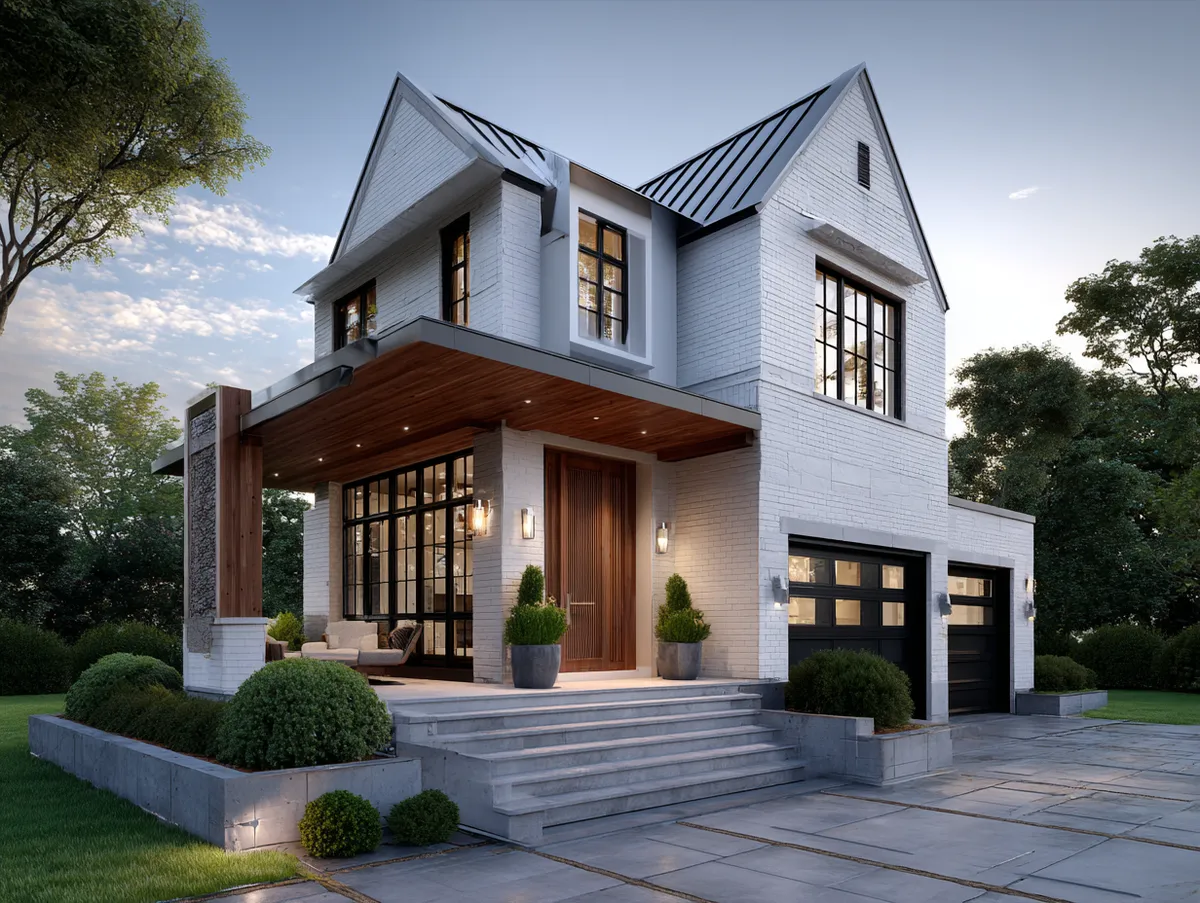
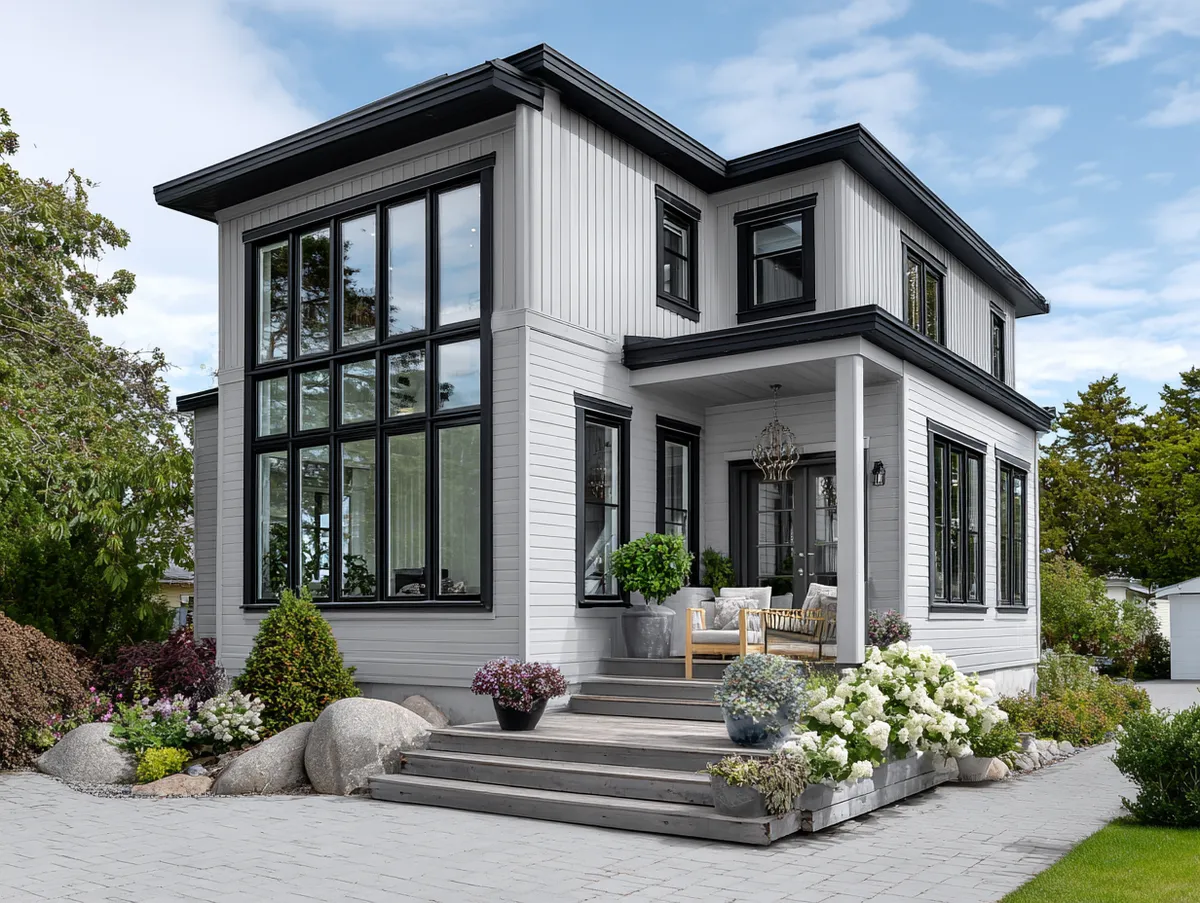


Material matters on a modern build. You’ll want PVC cellular board — Azek and Versatex are the two brands I come back to — because it machines like wood, holds paint without priming twice, and handles moisture exposure without rotting at the joints. At $4–$12 per linear foot installed, it costs more than pine upfront. Paint that pine exterior trim every five to seven years and the math reverses itself by year ten. What I skip on modern applications is elaborate crown at the header — a simple backband profile or a flat board with a small cap reads cleaner against contemporary architecture than a full bed molding would.
The proportion question is the one most people get wrong. Measure your window rough opening width, then calculate casing at roughly one-tenth of that dimension. A 36-inch wide window wants a 3.5-inch casing minimum; anything narrower looks applied rather than designed. Your top header should be slightly wider than your side casings — that’s the colonial rule that creates visual hierarchy. Ignore it and you’ll install trim that looks symmetrical but feels somehow flat, and you won’t be able to explain why.
Symmetry is doing more work here than it’s getting credit for. Colonial architecture built its authority on matching window placement and matching trim treatment — your eye reads it as ordered even before your brain identifies why. On a modern house, that same repetition provides the one thing contemporary design sometimes lacks: a sense that someone was paying attention. Exterior window trim options vary widely by style, and colonial casing happens to be one of the few profiles that reads as both period-accurate and architecturally current.
Don’t Do This
Don’t install colonial trim at two different widths on the same facade — say, 3.5 inches on the ground floor and 2.5 inches on the upper floor “because it was on sale.” The eye catches proportion inconsistency before it catches color or material differences. I’ve seen otherwise solid renovations undermined entirely by casing width that changes floor to floor. Buy enough stock for the full job before you start cutting.
Also avoid painting colonial trim the same color as the house wall in the hope that the molding shadow does the work for you. It doesn’t. You need at least enough value contrast for the casing to read as a separate plane — even a 20% difference in lightness is enough. Same color, same value: invisible trim, wasted installation cost.
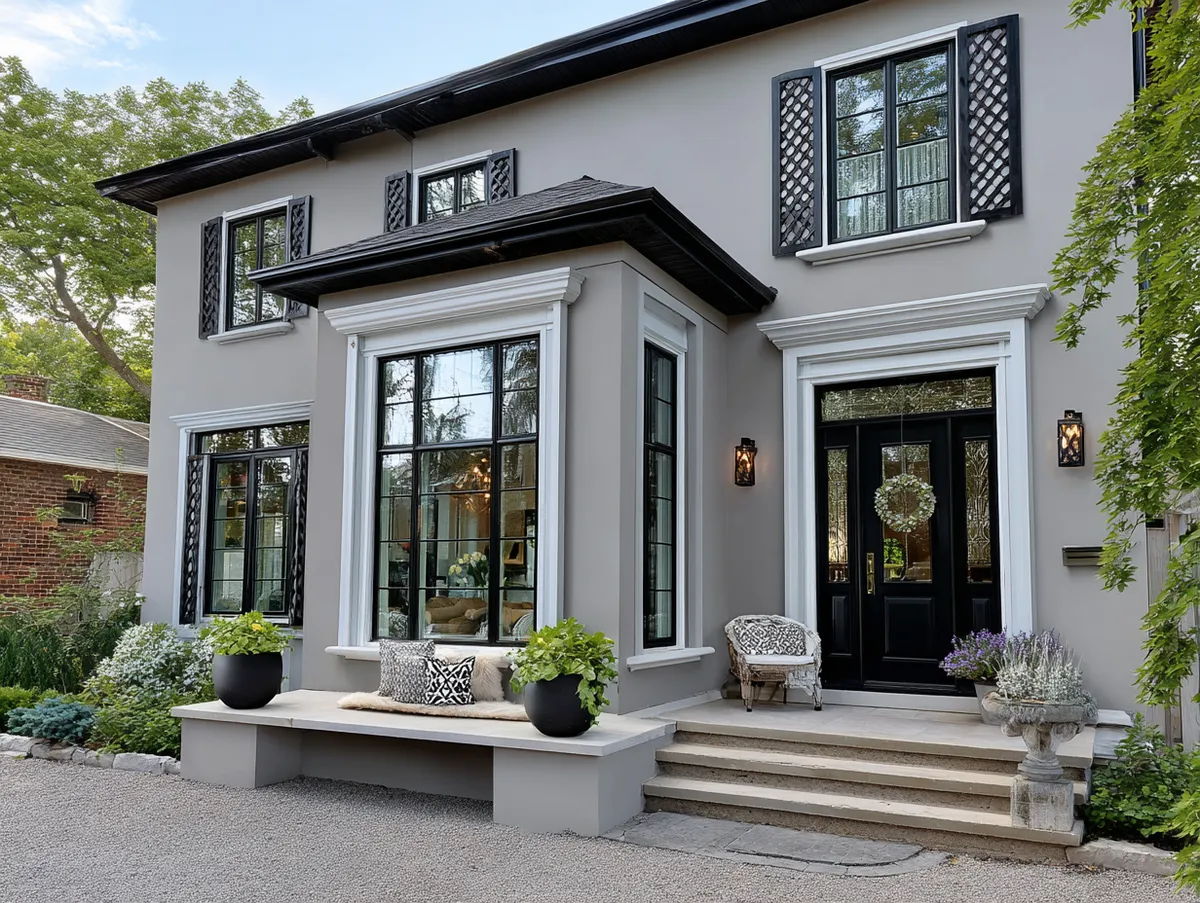
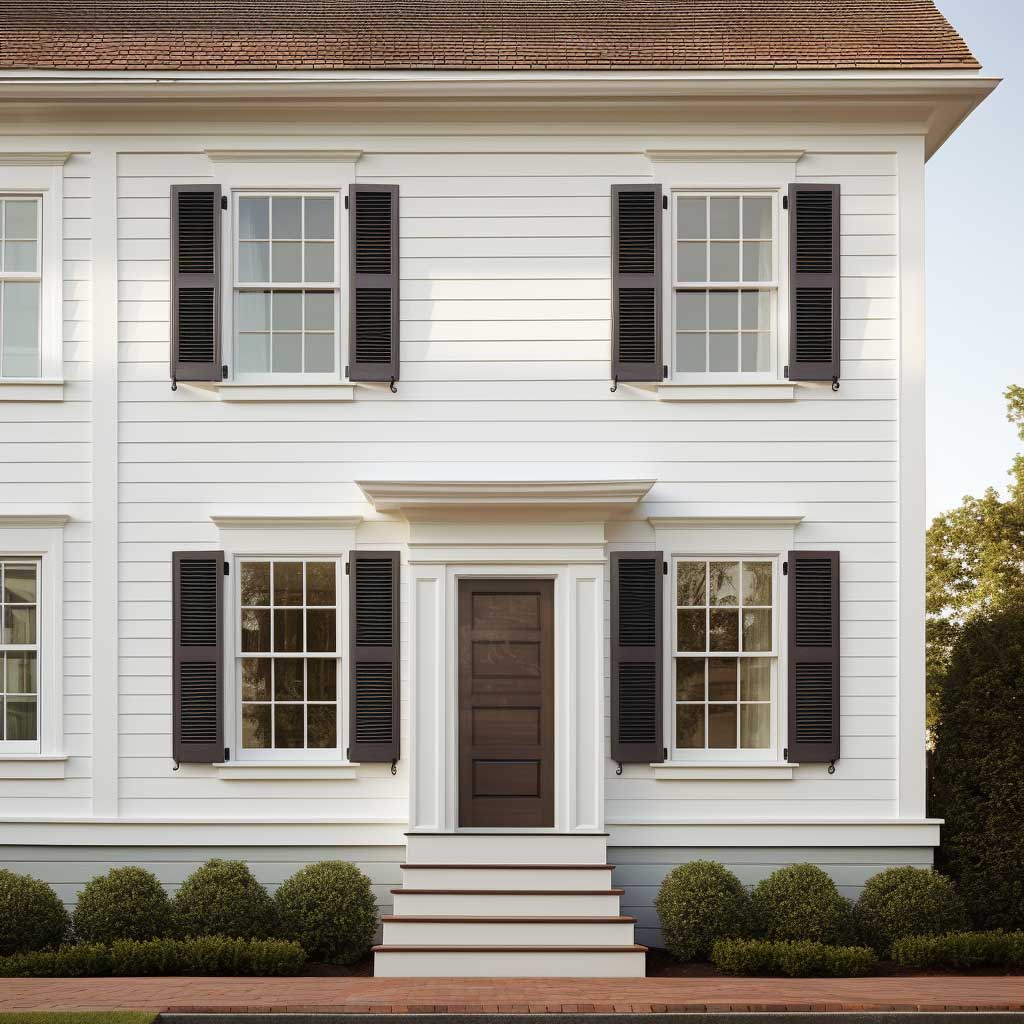
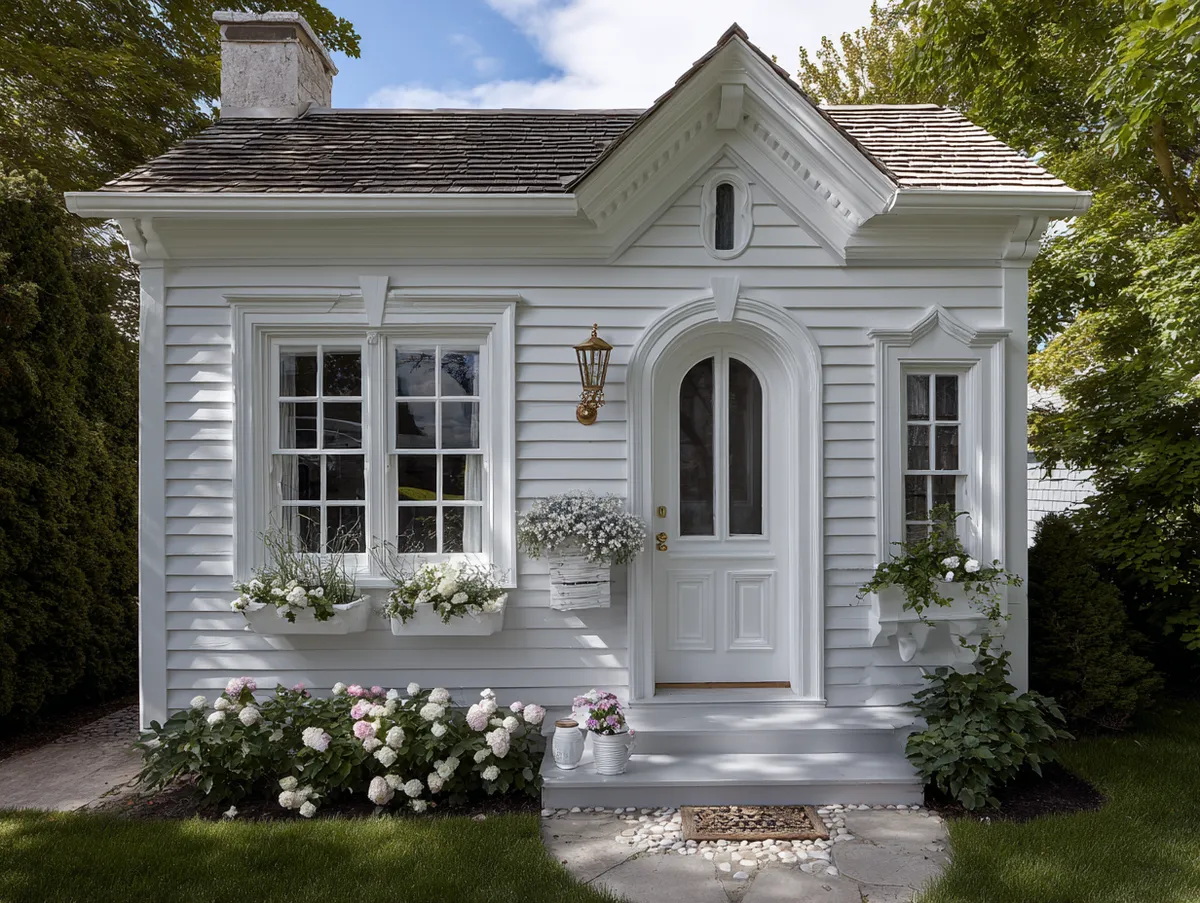
White Trim on a Colonial Revival Home Has a Specific Geometry Behind It
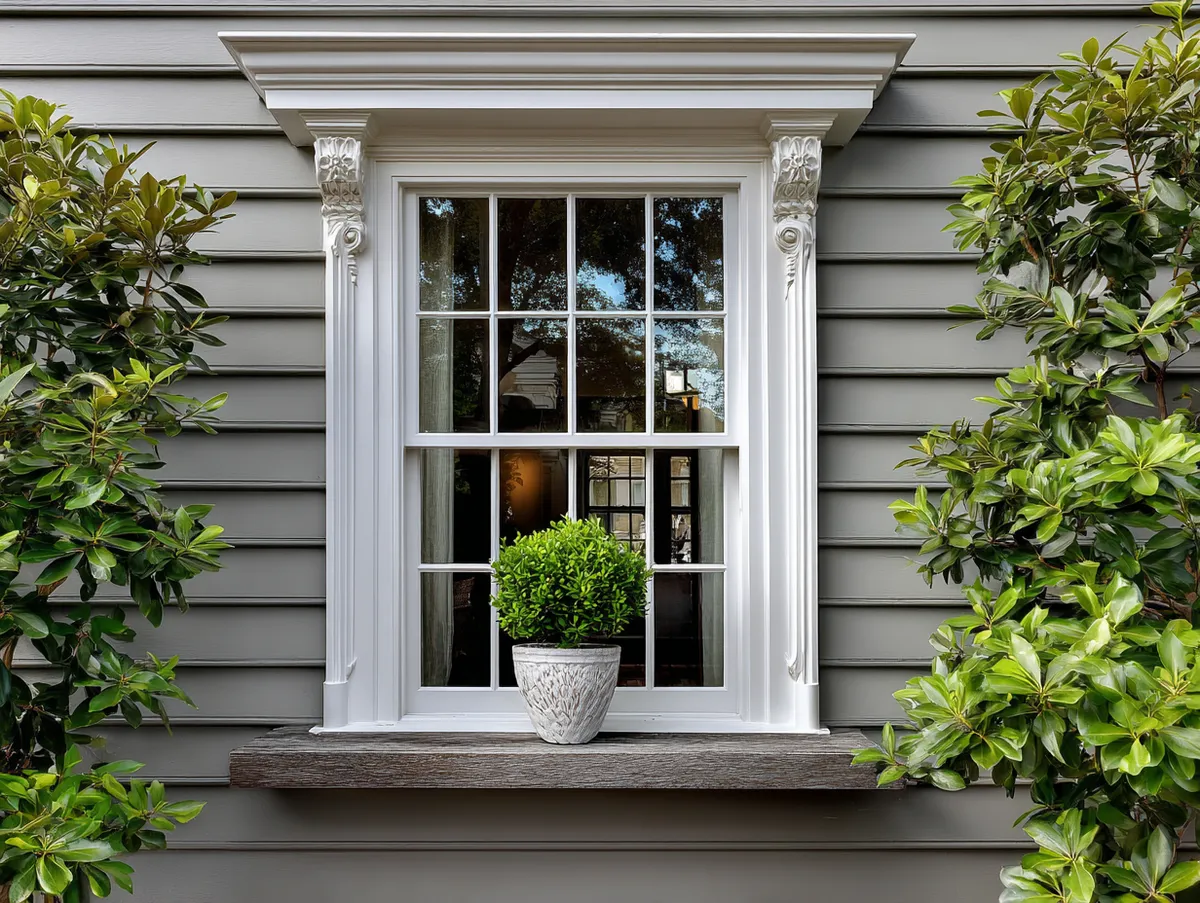
Colonial Revival homes from the 1900s through the 1940s were built around a set of window trim conventions that weren’t arbitrary — broad flat casing on the sides, a crown-molded header with a slight projection, a sill that extends past the casing on both sides and sits above a separate apron piece. Each element has a function: the crown creates shadow and hierarchy, the extended sill sheds water away from the wall, the apron gives the sill somewhere to visually land. You can buy Colonial Stop trim at any lumber yard for roughly $1.50 per linear foot in pine. The profile is correct. The installation is what separates good from mediocre.
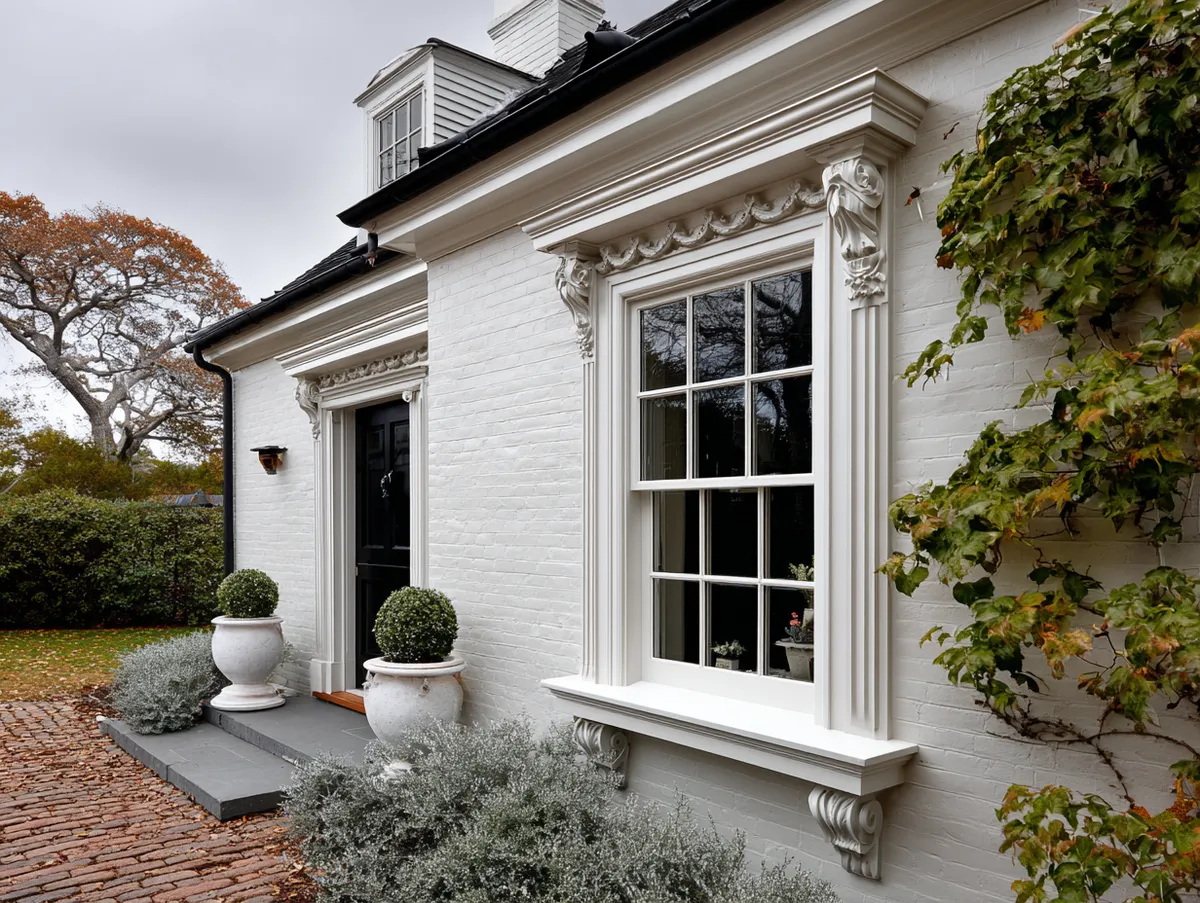


The white-on-dark contrast you see in these photos is doing the same thing a picture frame does for a painting — it isolates the subject and tells you exactly where to look. I’ve tried reversing this on a Colonial Revival: dark trim on a white body. It can work on a contemporary build, but on a period home it just looks wrong, like wearing a tuxedo jacket with jeans. The historical grammar of this style is light trim against a medium or dark body, and the reason it persists is that it’s correct, not merely traditional.
Craftsmanship shows up in the corners. Mitered corners fail on exterior trim — wood moves with moisture and temperature, and a miter joint opens up into a visible gap within two seasons. The correct method for colonial window casing exterior is butt joints: side casings terminate at the top, header casing sits on top of them. That joint is flat, easy to caulk tight, and stays tight. I’ve seen $15,000 exterior renovations undone by a carpenter who mitered the headers because it “looks cleaner.” It doesn’t. And it leaks.
Depth is the detail that photographs. The slight projection of the header beyond the wall plane creates a shadow line that changes through the day — morning light reads differently than afternoon light, and the trim looks three-dimensional in a way that flat, flush casing never does. Think of it like a relief map: even a quarter-inch of projection creates a landscape. A flat casing is a parking lot. Exterior window trim ideas for brick and classic houses often use this depth principle to maximum effect, particularly on masonry facades where the contrast between rough texture and crisp trim edges is especially sharp.
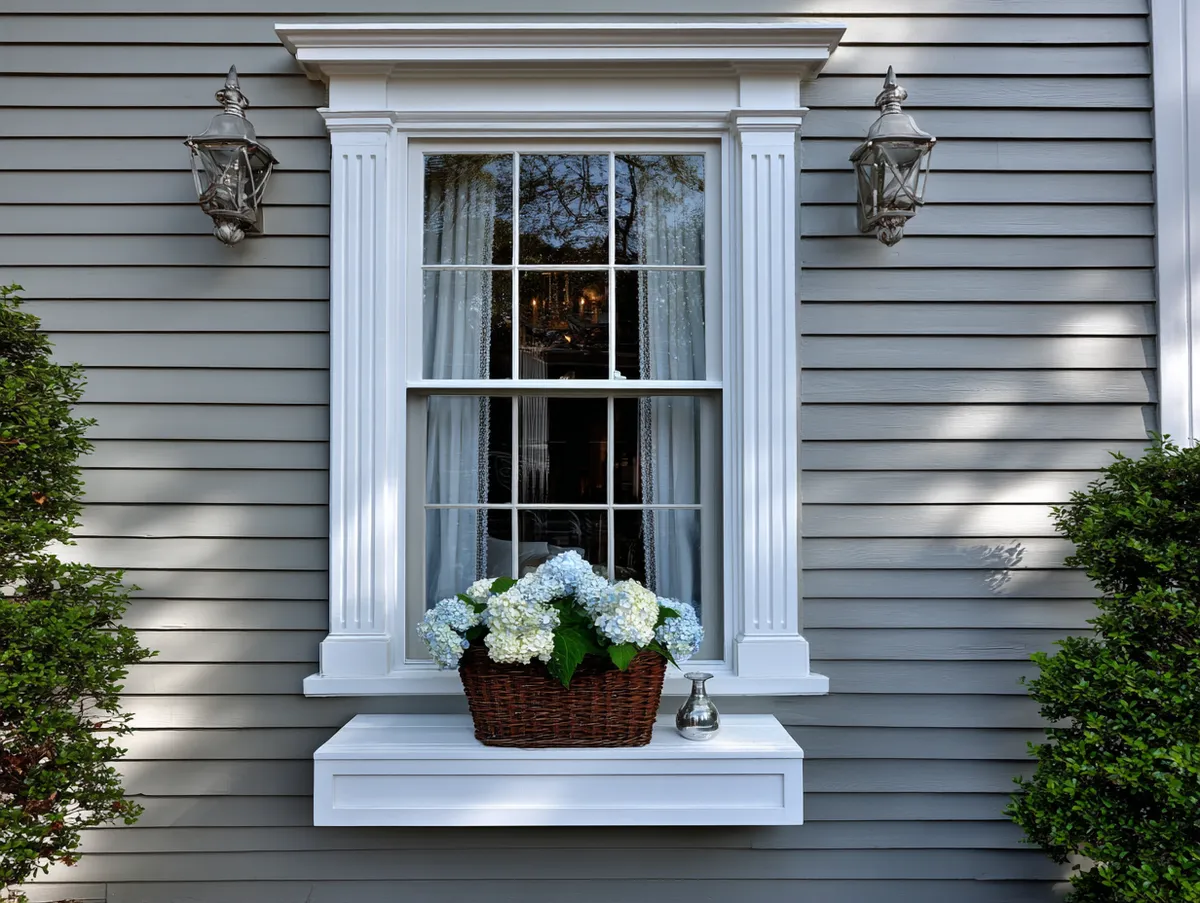
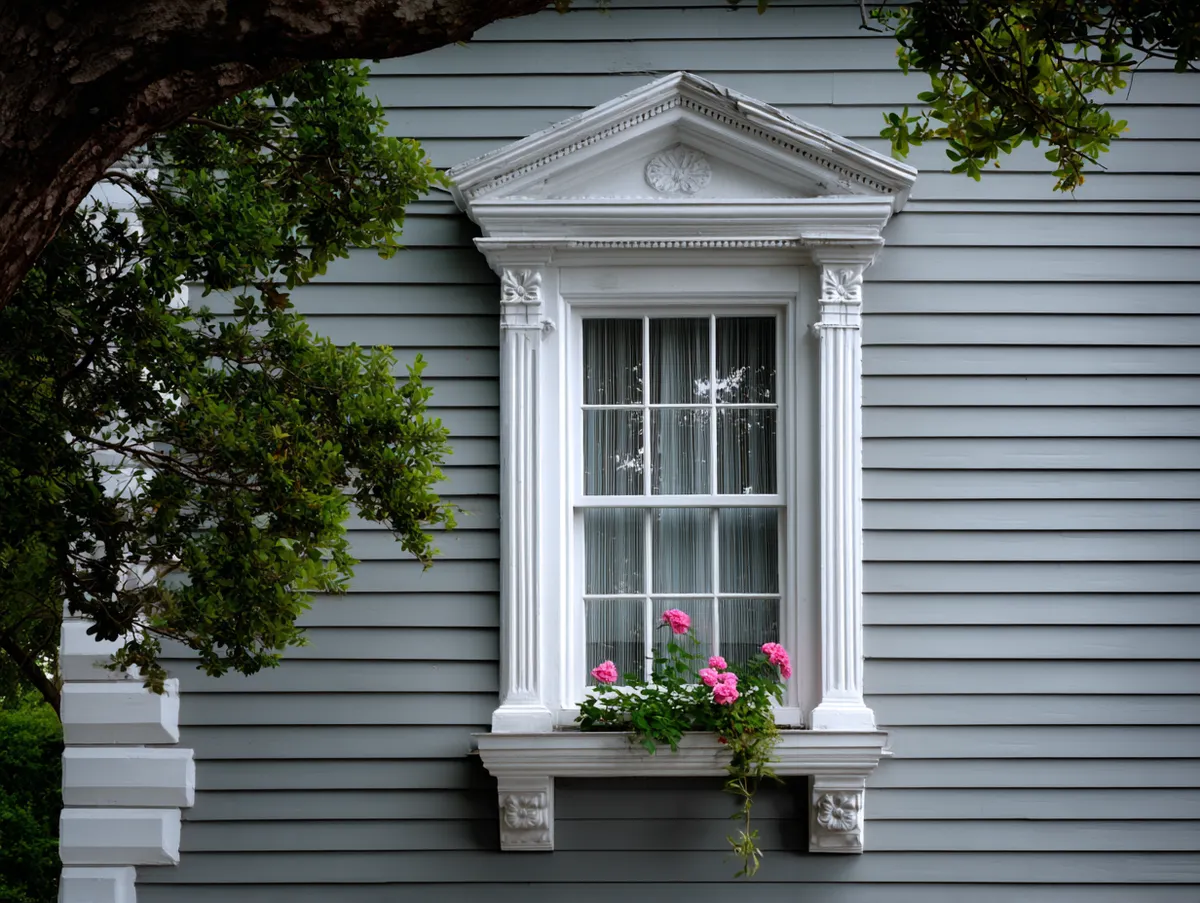
Colonial Trim on a Cottage Scale Needs a Smaller Profile, Not a Simpler One
Cottages are where colonial window trim gets misapplied most often. The instinct is to scale everything down — narrower casing, no header molding, skip the apron — and the result is trim that looks incomplete rather than proportional. The fix isn’t simplification. It’s correct scaling. A cottage window that’s 24 inches wide wants a 3-inch casing, and that casing still needs a profiled top element to read as colonial rather than generic. The crown can be smaller — a 5/8-inch backband rather than a full bed molding — but it has to be there or the trim loses its character.
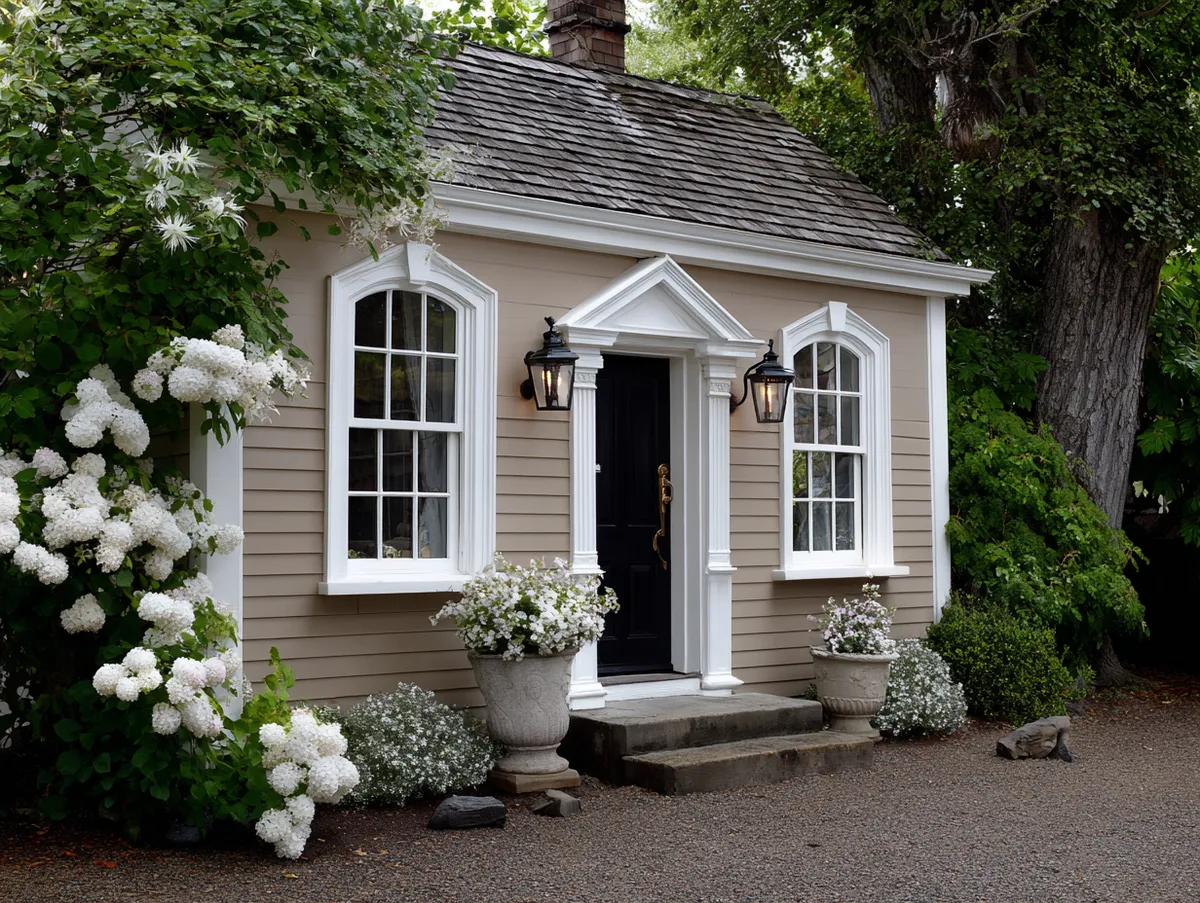
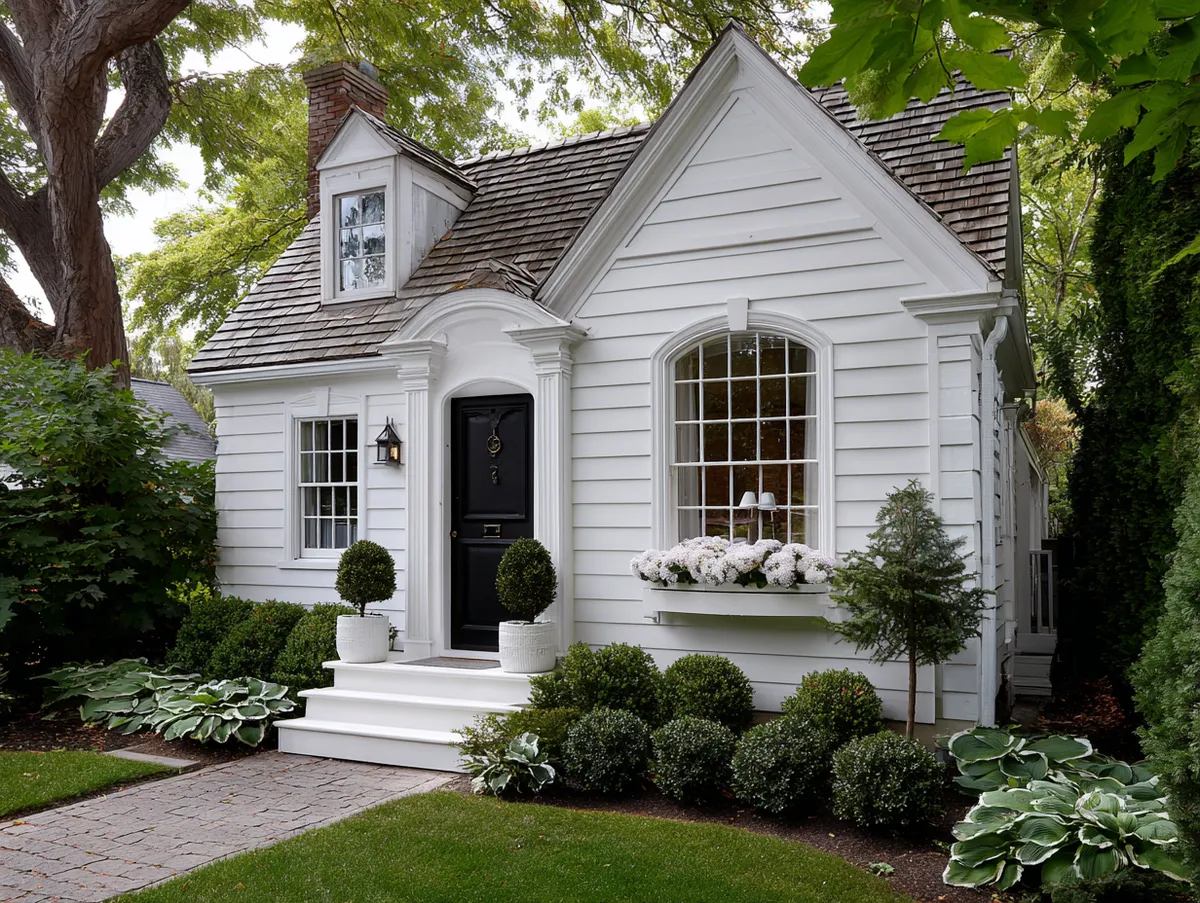
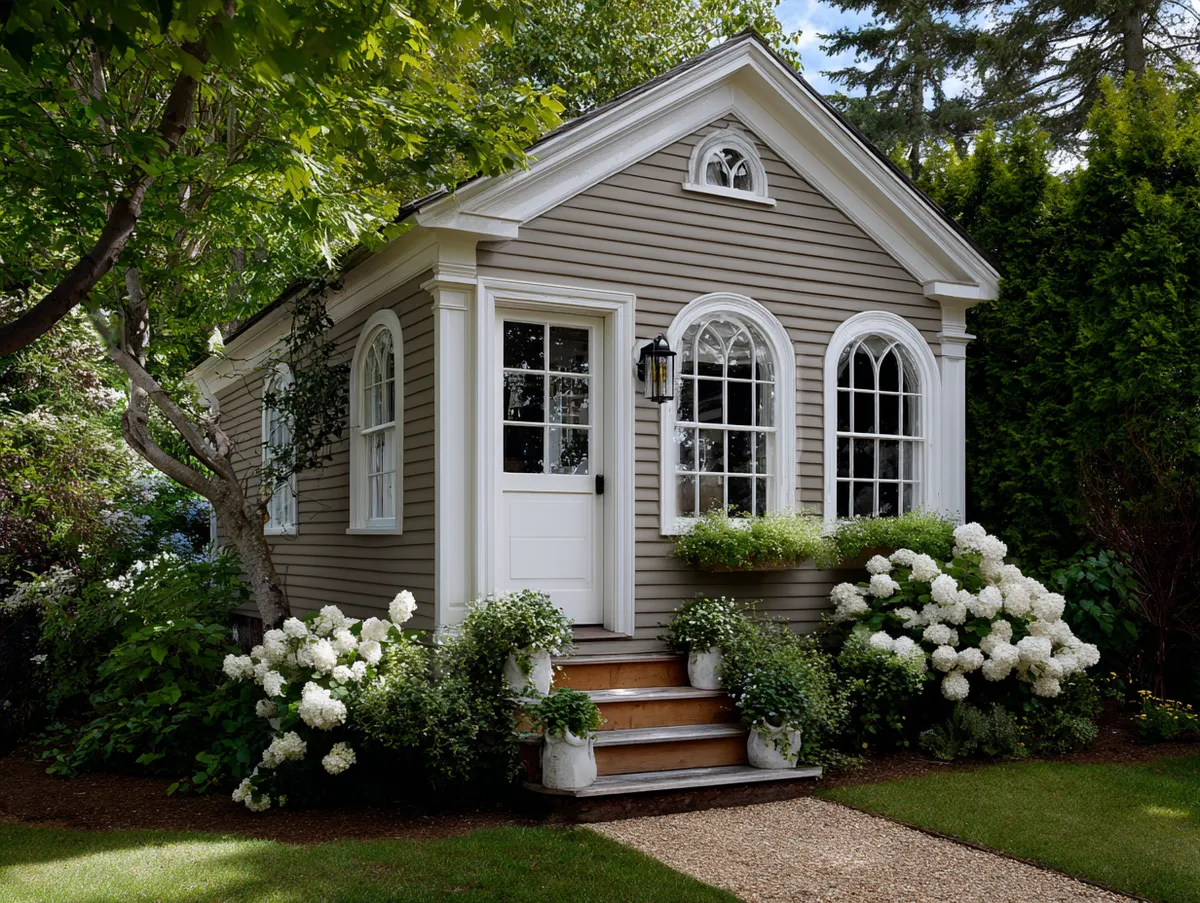


What the cottage in these photos demonstrates is the adaptability of colonial trim grammar across asymmetrical facades. Colonial Revival homes are formal and centered — everything aligns on an axis. A cottage ignores all that. Windows are at different heights, different sizes, sometimes different shapes. Colonial trim still works because the profile is applied consistently, not symmetrically. Each window gets the same casing treatment regardless of where it sits, and that consistency reads as intentional design even when the layout is irregular. It’s the architectural equivalent of wearing the same shoe on both feet — obvious in retrospect, effortful to actually do.
The contrast ratio on a cottage can be more casual than on a formal Colonial Revival. You don’t need stark white trim against near-black siding. A cream trim against a warm grey body, or a soft taupe trim against a deeper sage, gives the cottage scale warmth without the formality the profile would otherwise imply. I stole this color approach from a renovation in coastal Maine where the architect specified Benjamin Moore Linen White trim against Revere Pewter body — it’s the combination that made the house look like it had been there for eighty years on day one. Exterior window framing trim design ideas for this kind of approach are worth studying before you commit to a color pair.
Durability matters more on a cottage than on a large house, because cottages are often vacation properties or secondary homes that don’t get regular maintenance attention. Cedar is the traditional choice — it’s naturally rot-resistant and takes paint better than pine — but at $3–$5 per linear foot for clear cedar stock, budget adds up fast on a house with twelve windows. My practical recommendation for a coastal or humid-climate cottage is cellular PVC at the trim pieces nearest the ground, and cedar above the first floor. You get the durability where moisture exposure is highest and the cost savings where it matters least.
Don’t Do This on a Cottage
Don’t apply full Colonial Revival header proportions — a 6-inch tall cap with two layers of molding — on a cottage window that’s only 18 inches tall. The header becomes larger than the window itself, and the result looks like a crown that belongs to someone else’s head. Scale the header depth to roughly one-fifth of the window height. On a small cottage window, that means a 3-to-4-inch head piece including any cap element. More than that and you’ve stopped adding character and started adding noise.
Interior colonial window trim follows the same profile logic as the exterior — flat side casings, wider header, plinth blocks at the base if budget allows — but the material changes to paint-grade MDF or finger-jointed pine at $0.75–$2 per linear foot. You’re not fighting moisture indoors, so there’s no reason to spend exterior-grade material costs on interior applications. The visual result is identical and the installation is faster because you’re not dealing with flashing tape and weatherproofing steps.
| Material | Cost (per linear ft) | Best For | Maintenance |
|---|---|---|---|
| PVC Cellular (Azek, Versatex) | $4–$12 installed | Humid climates, near-ground applications, modern homes | Low — repaint every 10–15 years |
| Clear Cedar | $3–$5 materials only | Colonial Revival, cottages, dry climates | Medium — repaint every 5–7 years |
| Pine (paint-grade) | $1–$3 materials only | Interior trim, dry exterior climates only | High — paint every 5 years exterior |
| Composite (LP SmartTrim, Boral TruExterior) | $2–$5 materials only | Mid-range projects, moisture-exposed locations | Low-medium — holds paint longer than wood |
| MDF (paint-grade) | $0.75–$2 materials only | Interior colonial trim only — never exterior | Low interior, fails immediately if wet |
Worth Saving
Colonial window trim exterior works on any house — the only variable is which proportions you pick.
I’ve put it on a 1920s Colonial Revival and a 2019 modern farmhouse and it improved both. The profile is old enough to carry authority and simple enough not to impose a period style.
Match your casing width to your window size, pick a material your climate deserves, and get the color contrast relationship right before you buy a single board. The installation is the easy part.
Save this post before your next exterior project — the proportions table alone will save you a bad decision.
Related Topics